
Getting Started with the API
Welcome to the Flowcase API. This guide walks you through your first request using three common tools:
- cURL: a command-line tool for making HTTP requests
- Python 3: a versatile programming language
- Postman: a graphical application for testing APIs
Before you begin, make sure you have the following:
API credentials: a unique credential that grants access to the Flowcase API. If you do not have one yet, see Authentication & Security to get started.
Flowcase account: an active Flowcase account for your company.
Your company's subdomain: the unique part of your company's Flowcase URL. For example, if your company's Flowcase URL is
https://acme.flowcase.com, then your subdomain isacme.
Using cURL
cURL sends data to and from a server over several protocols, including HTTP. It is a quick way to test API requests from the command line.
When using cURL with the Flowcase API, include these headers in your requests:
Content-Type: application/json: tells the API that you are sending data in JSON format.Authorization: Bearer $TOKEN: carries your API token, which authenticates your requests. Replace$TOKENwith your actual API token.
Here is an example that calls the User API and retrieves a list of users:
TOKEN=<your-api-token-goes-here>
SUBDOMAIN=<your-companies-subdomain-goes-here>
curl "https://${SUBDOMAIN}.flowcase.com/api/v2/users/search" \
    -H "Content-Type: application/json" \
    -H "Authorization: Bearer ${TOKEN}"
Replace <your-api-token-goes-here> with your actual API token and <your-companies-subdomain-goes-here> with your company's subdomain.
After running this command, you should see a JSON response containing a list of users in your company. The response also includes an x-request-id header, which is a unique identifier for the request.
Using Python 3
Python is a versatile programming language that you can use to interact with the Flowcase API. The example below uses the popular requests library to make HTTP requests.
First, make sure you have Python 3 installed on your computer. You can download it from the official Python website: python.org/downloads
Next, install the requests library by running the following command in your terminal or command prompt:
pip install requests
Now, here is an example that calls the User API and retrieves a list of users:
import requests

TOKEN = '<your-api-token-goes-here>'
SUBDOMAIN = '<your-companies-subdomain-goes-here>'

url = f'https://{SUBDOMAIN}.flowcase.com/api/v2/users/search'
headers = {
    'Content-Type': 'application/json',
    'Authorization': f'Bearer {TOKEN}'
}

response = requests.get(url, headers=headers)

if response.status_code == 200:
    users = response.json()
    print(users)
else:
    status_code = response.status_code
    request_id = response.headers["x-request-id"]
    log_message = (
        f"Request failed with status code {status_code}. "
        f"Request ID: {request_id}"
    )
    print(log_message)
Remember to replace <your-api-token-goes-here> with your actual API token and <your-companies-subdomain-goes-here> with your company's subdomain.
When you run this Python script, it prints the list of users retrieved from the API.
Using Postman
Postman is an application that makes it easy to test APIs without writing any code. It gives you a graphical interface for making HTTP requests and viewing responses. Download and install Postman from the official website: postman.com/downloads
Postman has a lot of features, but this walkthrough covers only how to configure it to talk to a Flowcase API endpoint.
The following example uses the User API endpoint: https://<your-companies-subdomain-goes-here>.flowcase.com/api/v2/users/search.
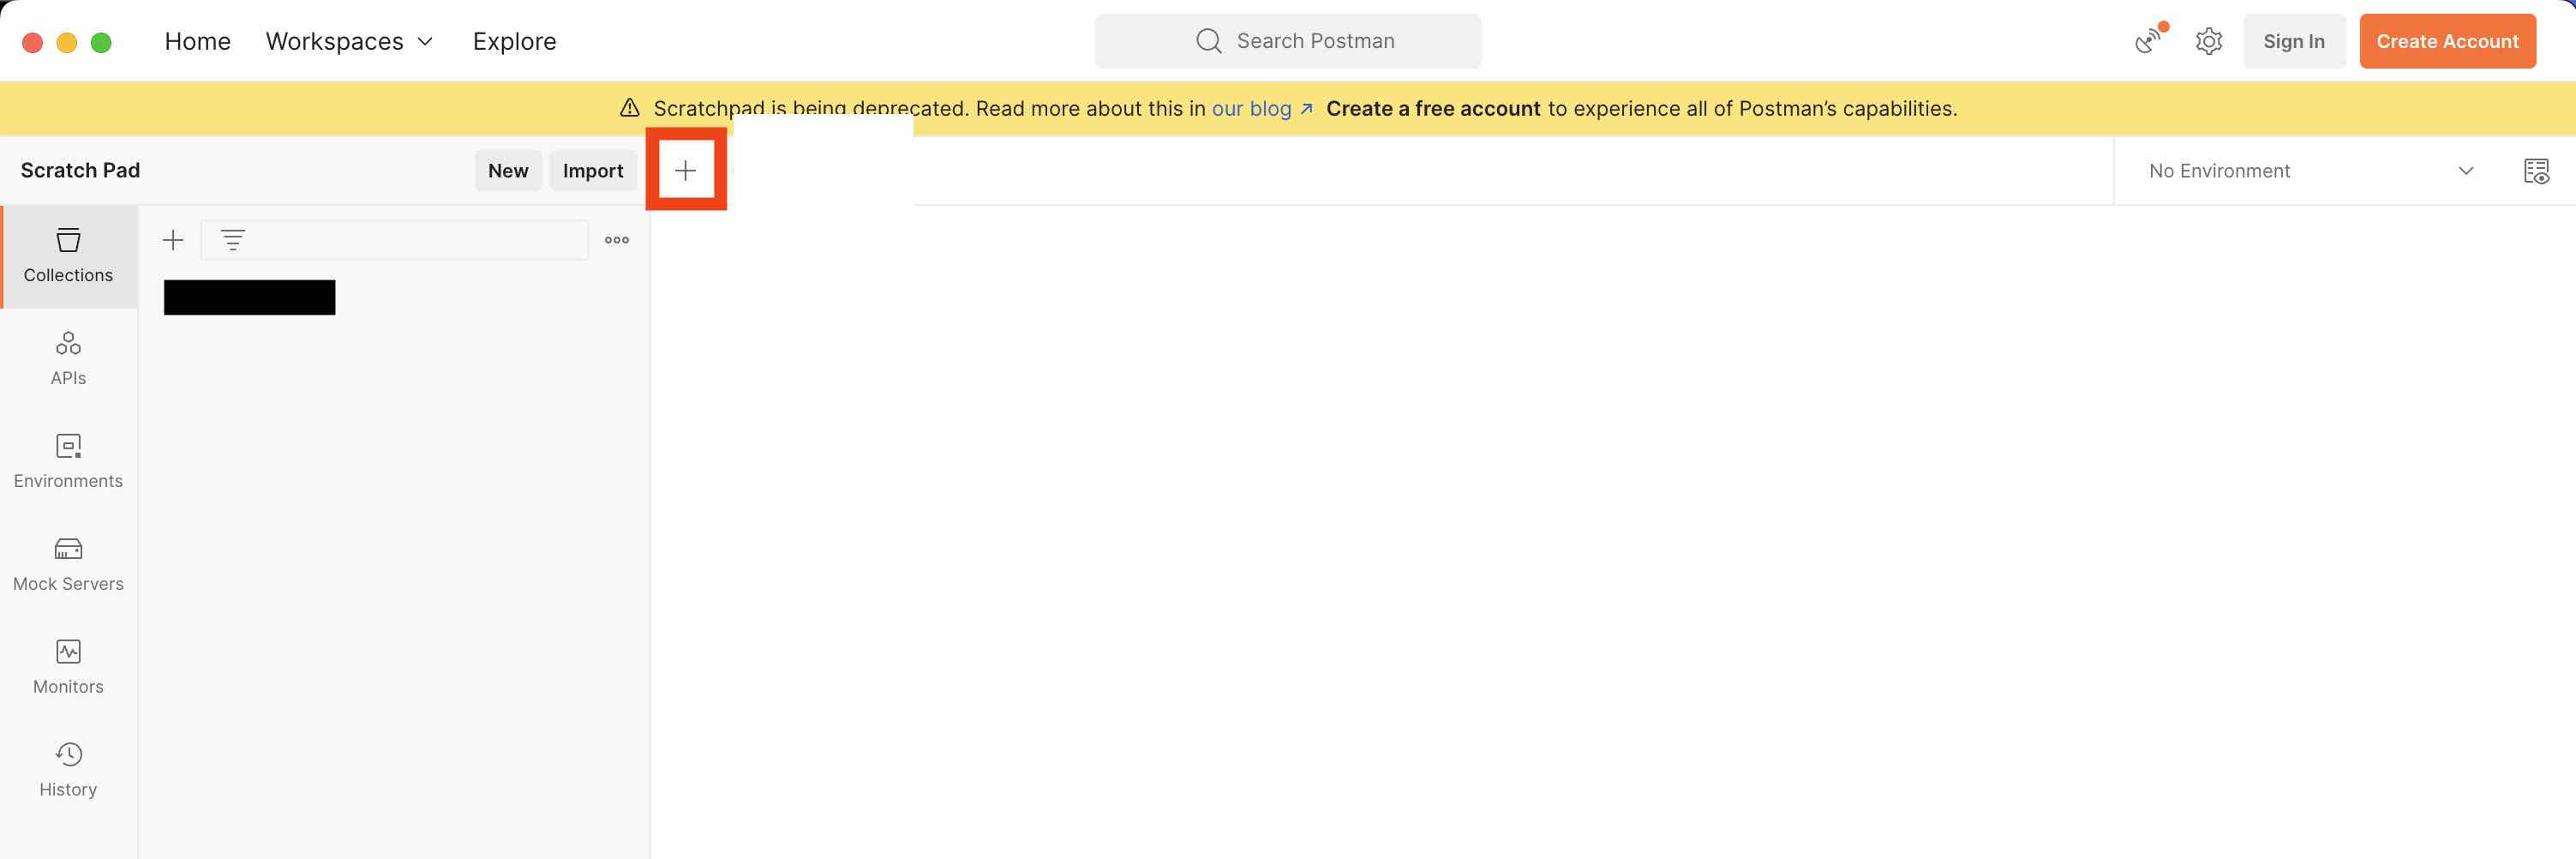
First, open up Postman and click on the '+' icon in the top-left corner of the 'Scratch Pad' area.
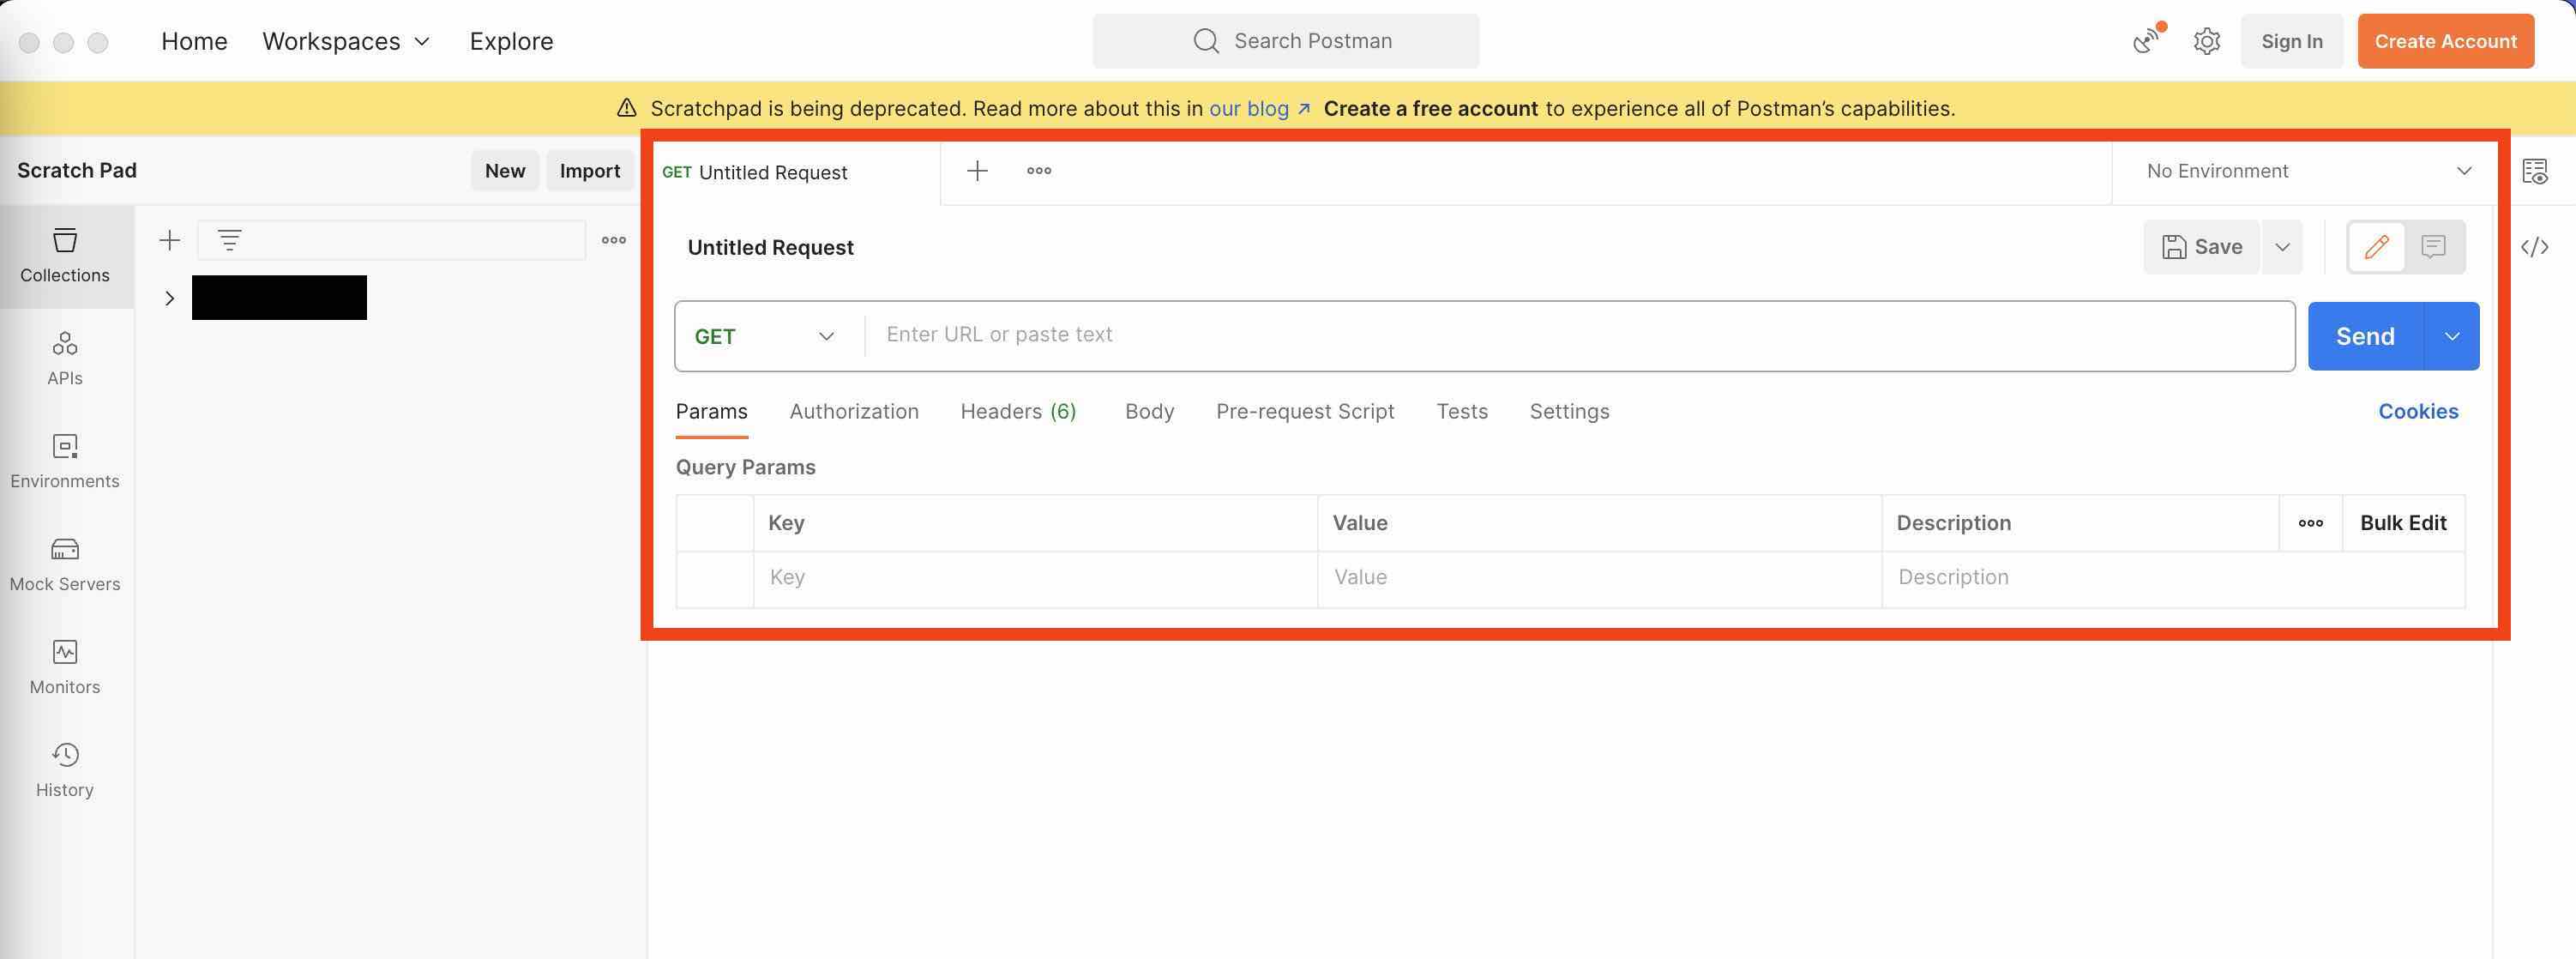
This will open up a 'New Request' tab which should be titled 'Untitled Request'.
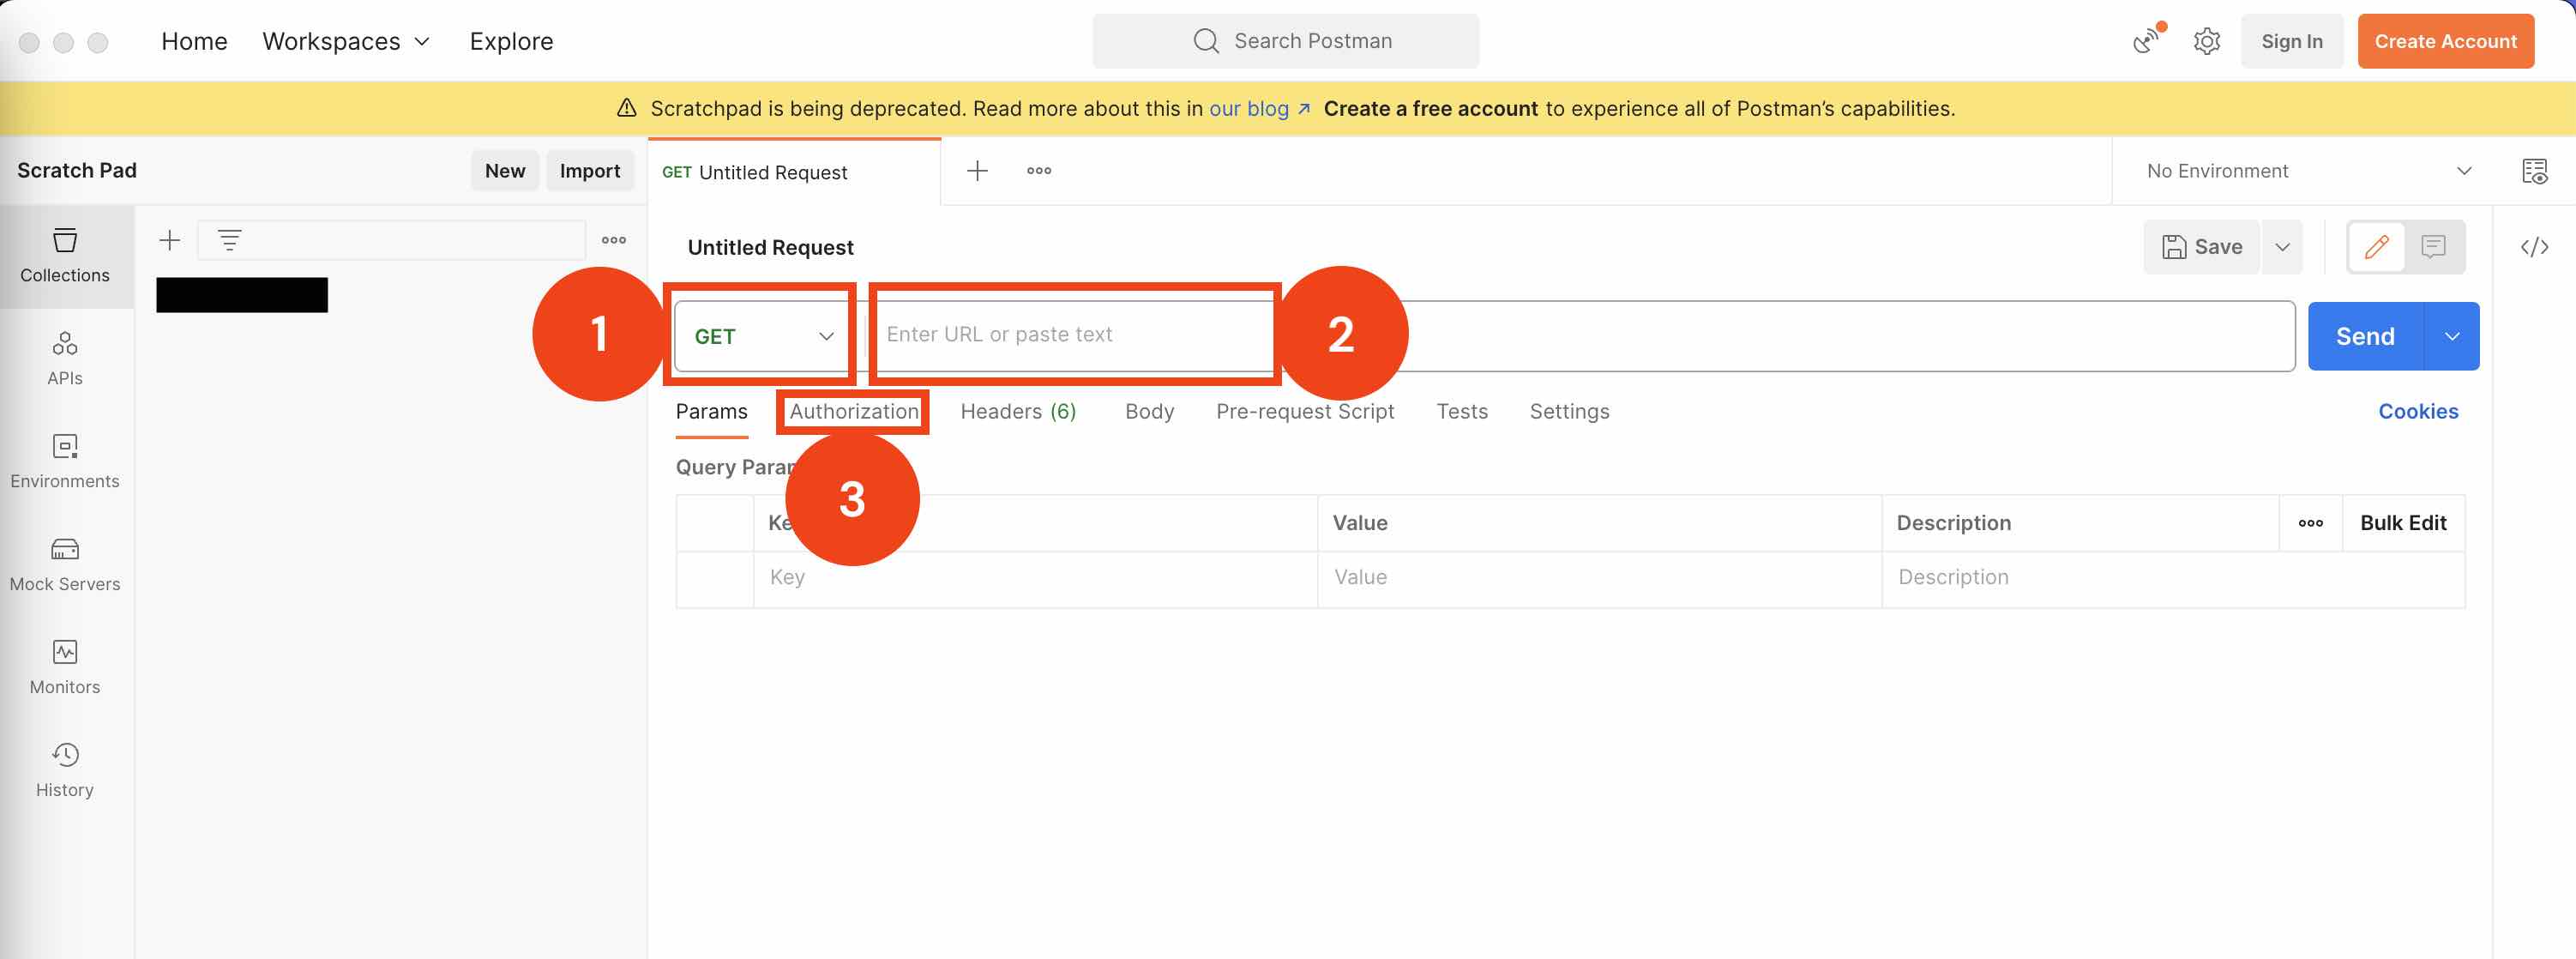
In the 'New Request' tab:
Set the HTTP Method to
GET. Please note that if you want to use a different endpoint, set this to the HTTP method the endpoint expects.Enter the following URL in the 'Enter URL' field:
https://your-companies-subdomain-goes-here.flowcase.com/api/v2/users/searchreplacing the 'your-companies-subdomain-goes-here' with your company's subdomain. Please note that you can use ANY Flowcase endpoint you want, this is just an example.Click on the 'Authorization' tab.
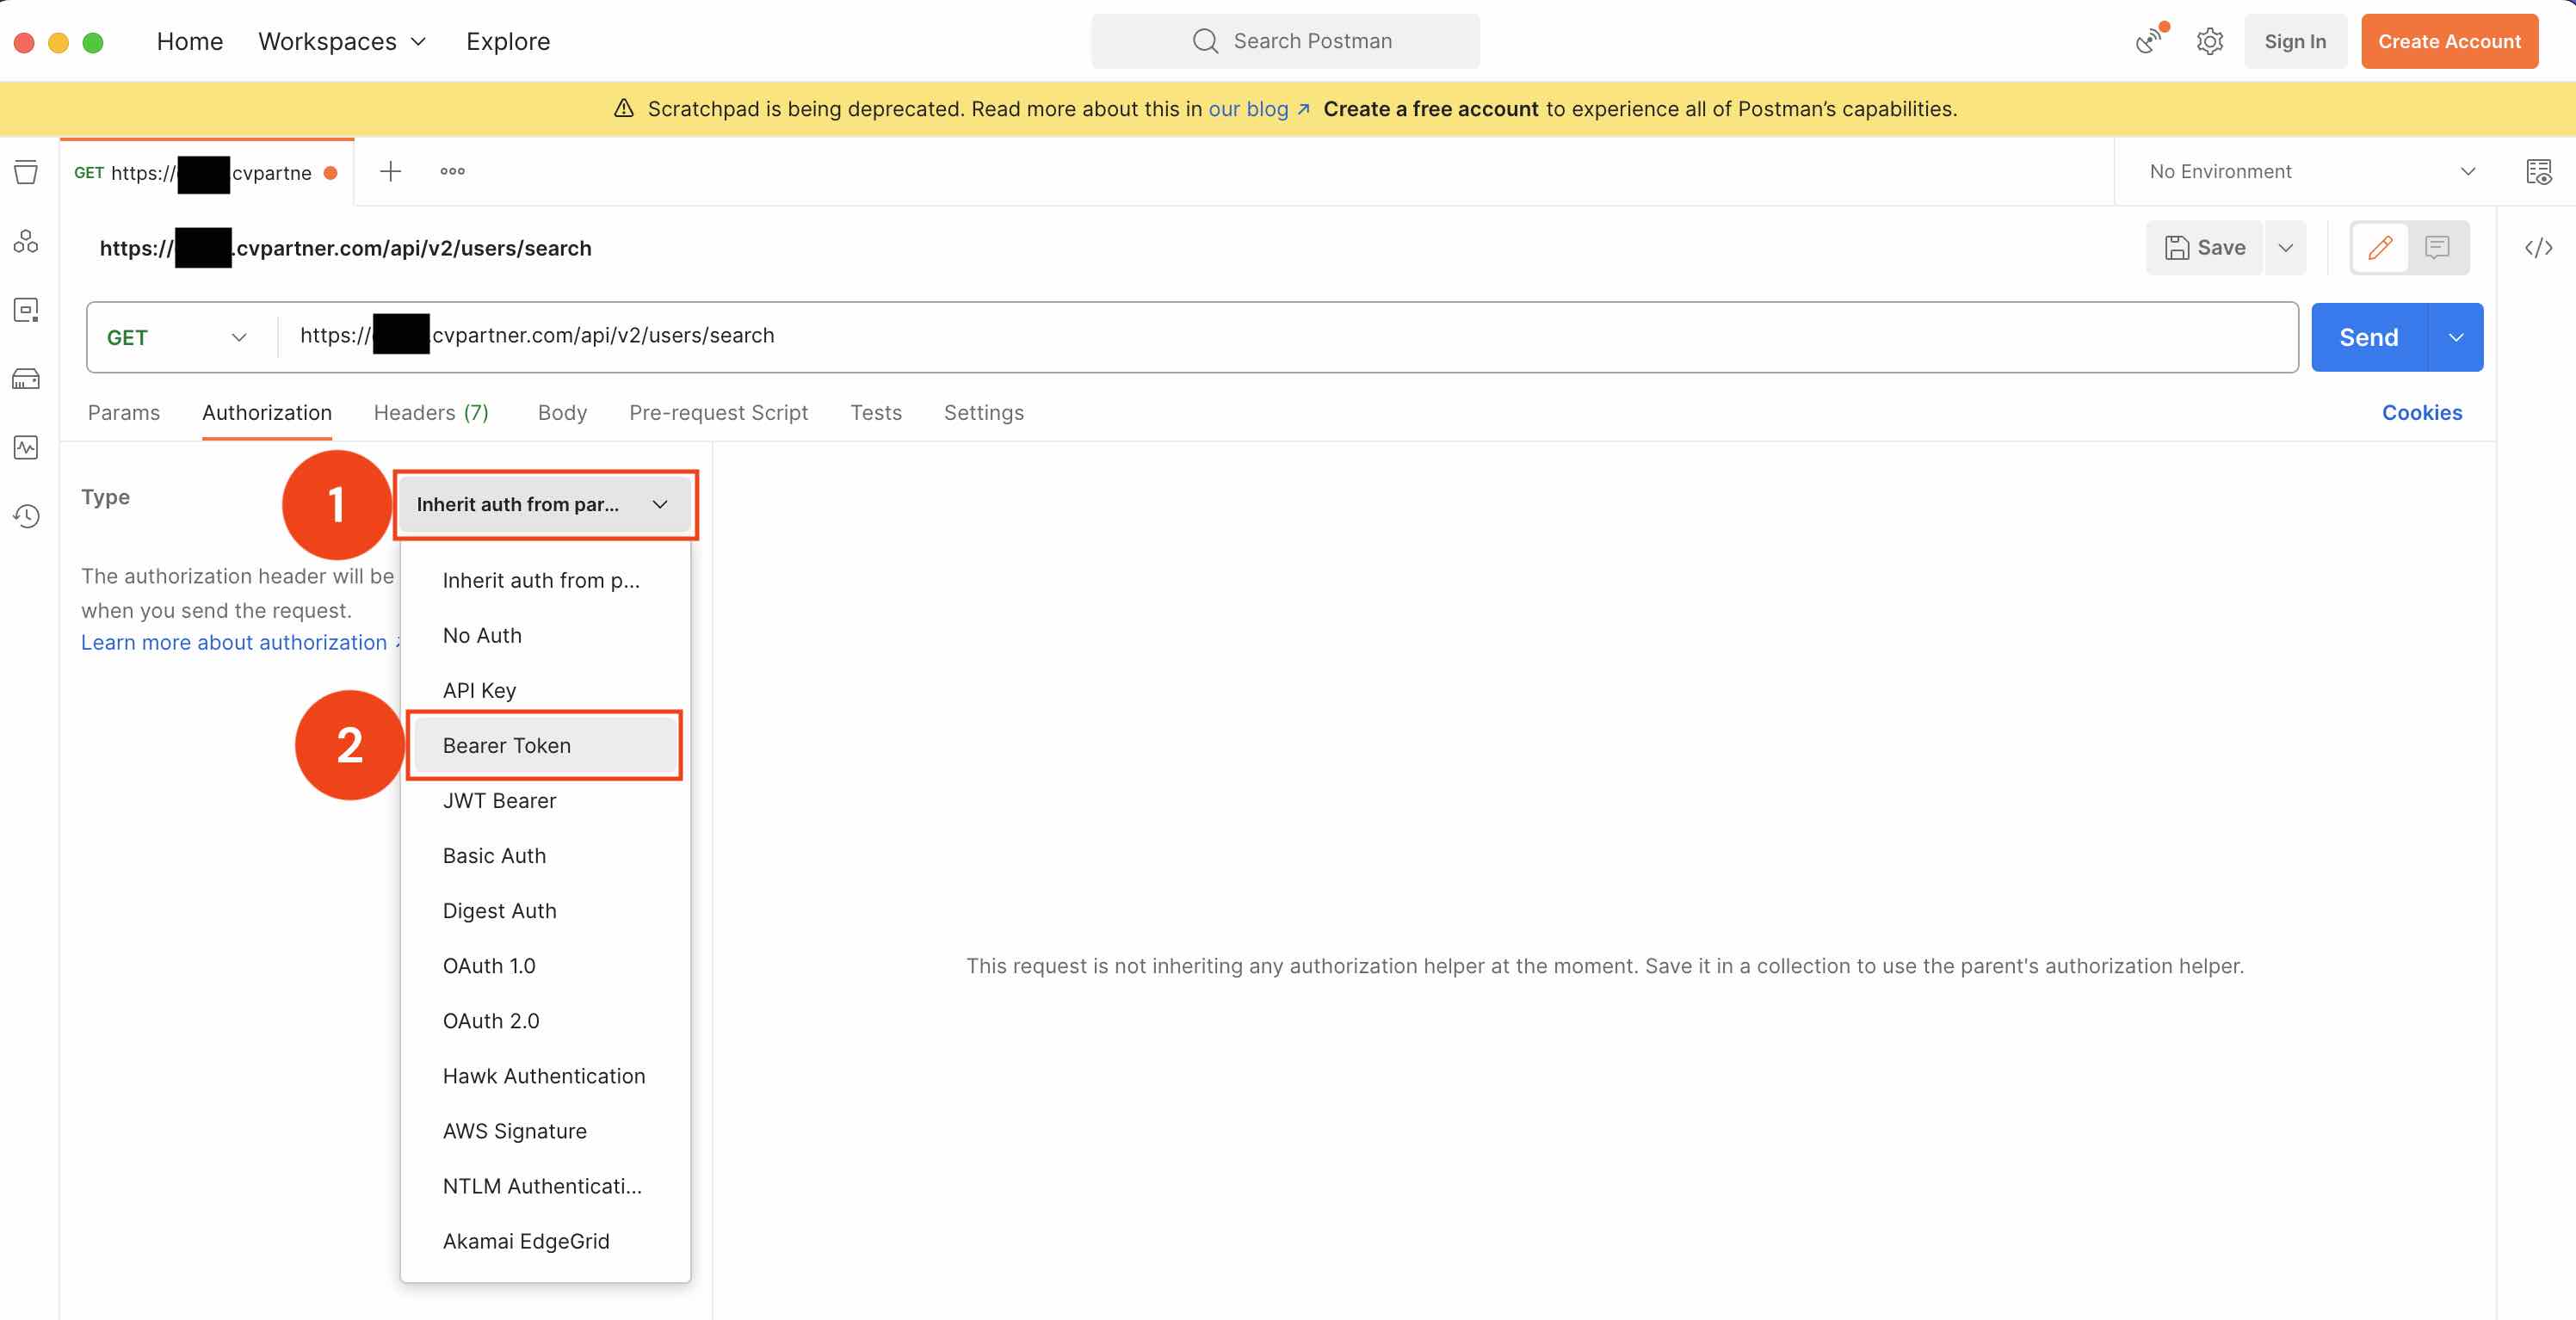
After clicking on the 'Authorization' tab, Postman will switch to the 'Authorization' settings panel.
Click the dropdown box that says 'Inherit auth from parameters'.
Select 'Bearer Token' from the list of options.
After selecting 'Bearer Token', Postman will switch to the Token panel.
Enter your API token into the 'Token' field.
Click on the 'Headers' tab.
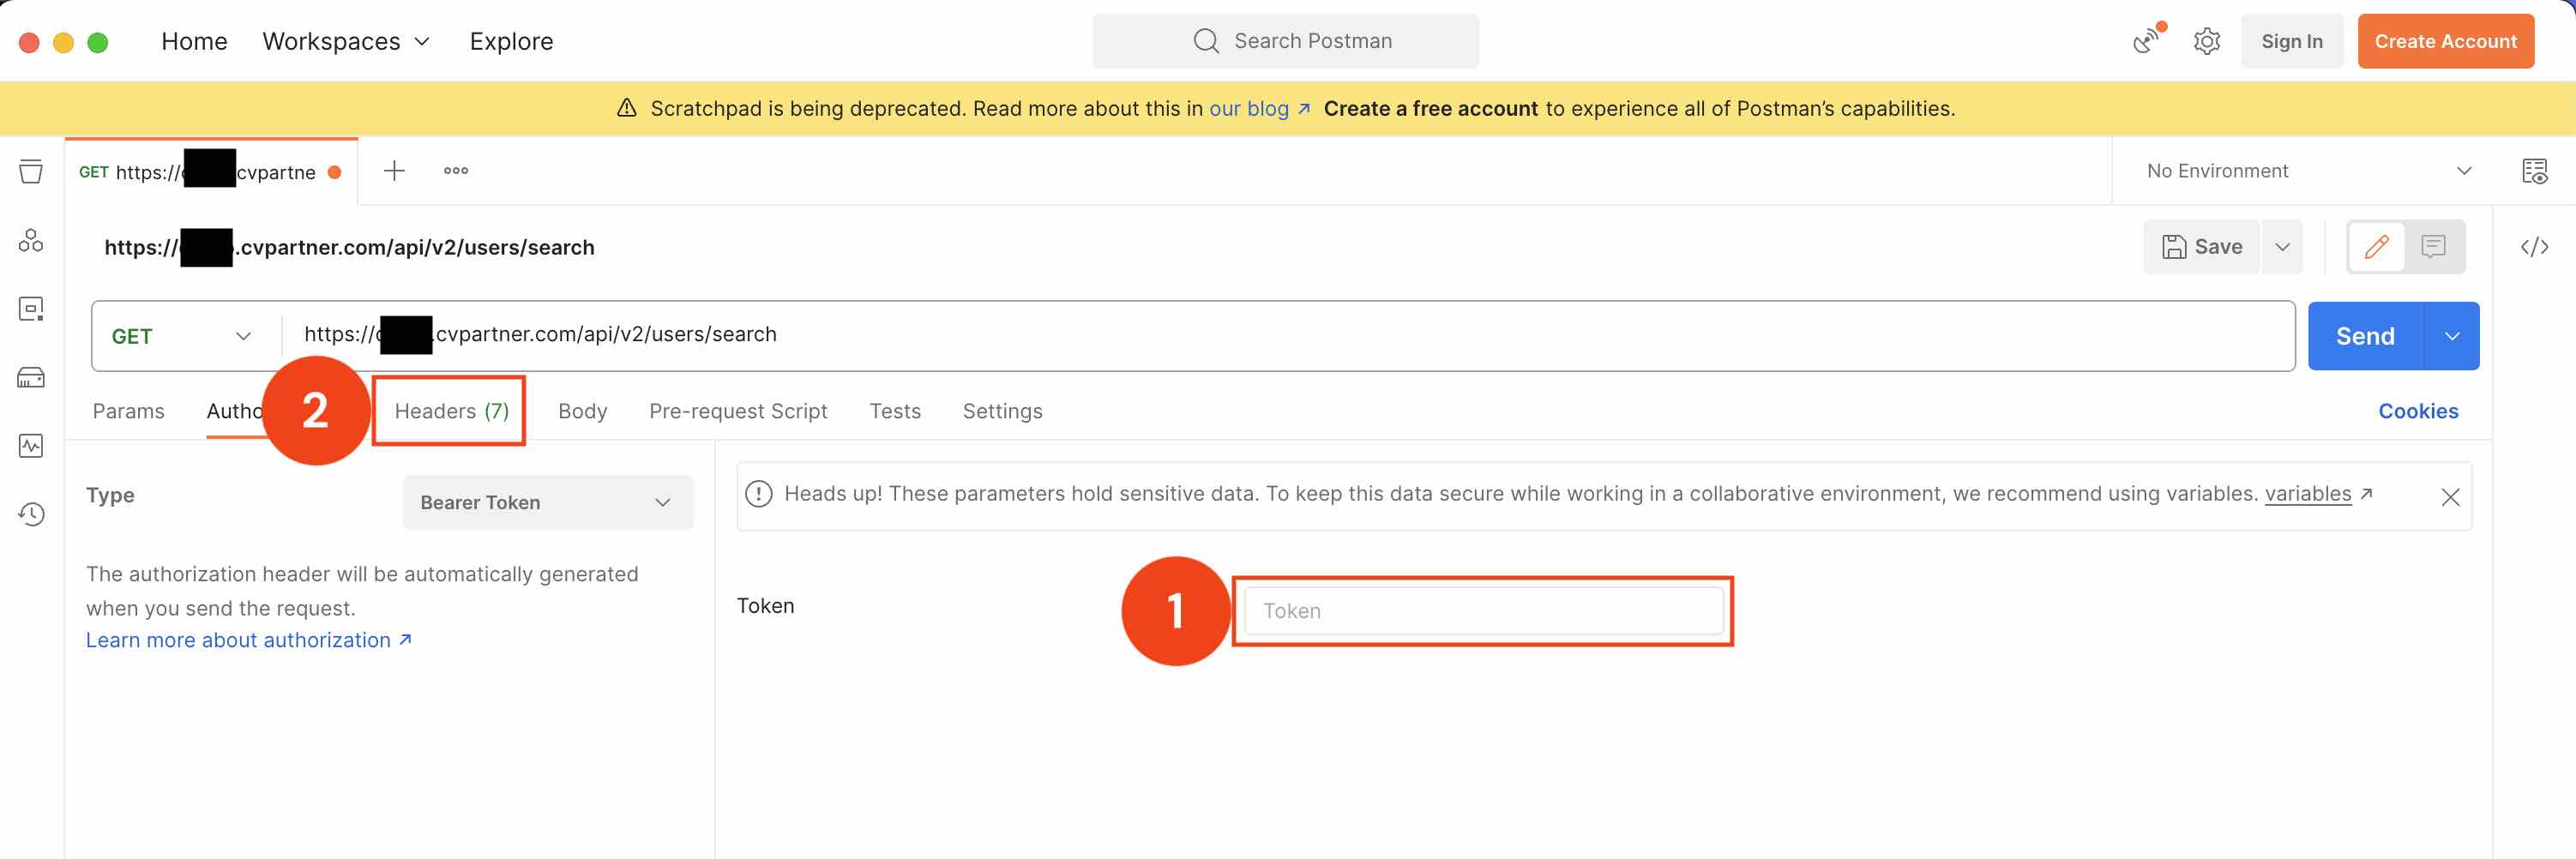
After clicking on the 'Headers' tab, Postman will switch to the Headers panel.
Enter 'Content-Type' in the 'Key' field.
Enter 'application/json' in the 'Value' field.
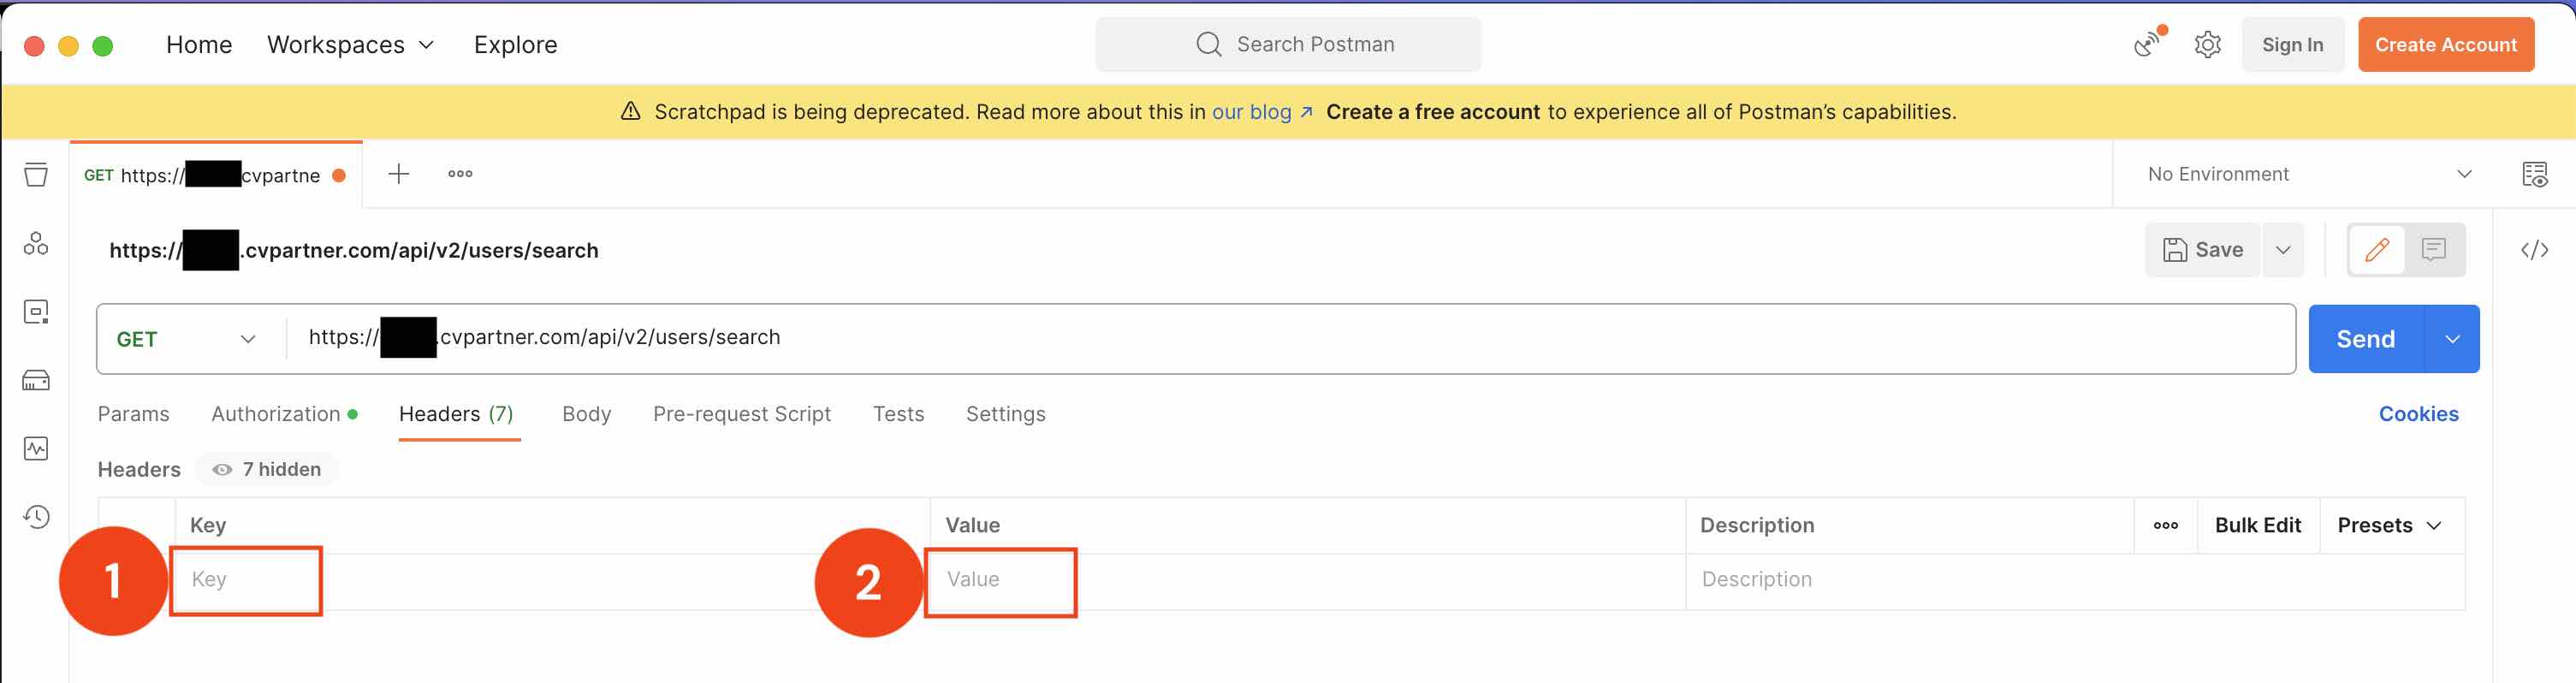
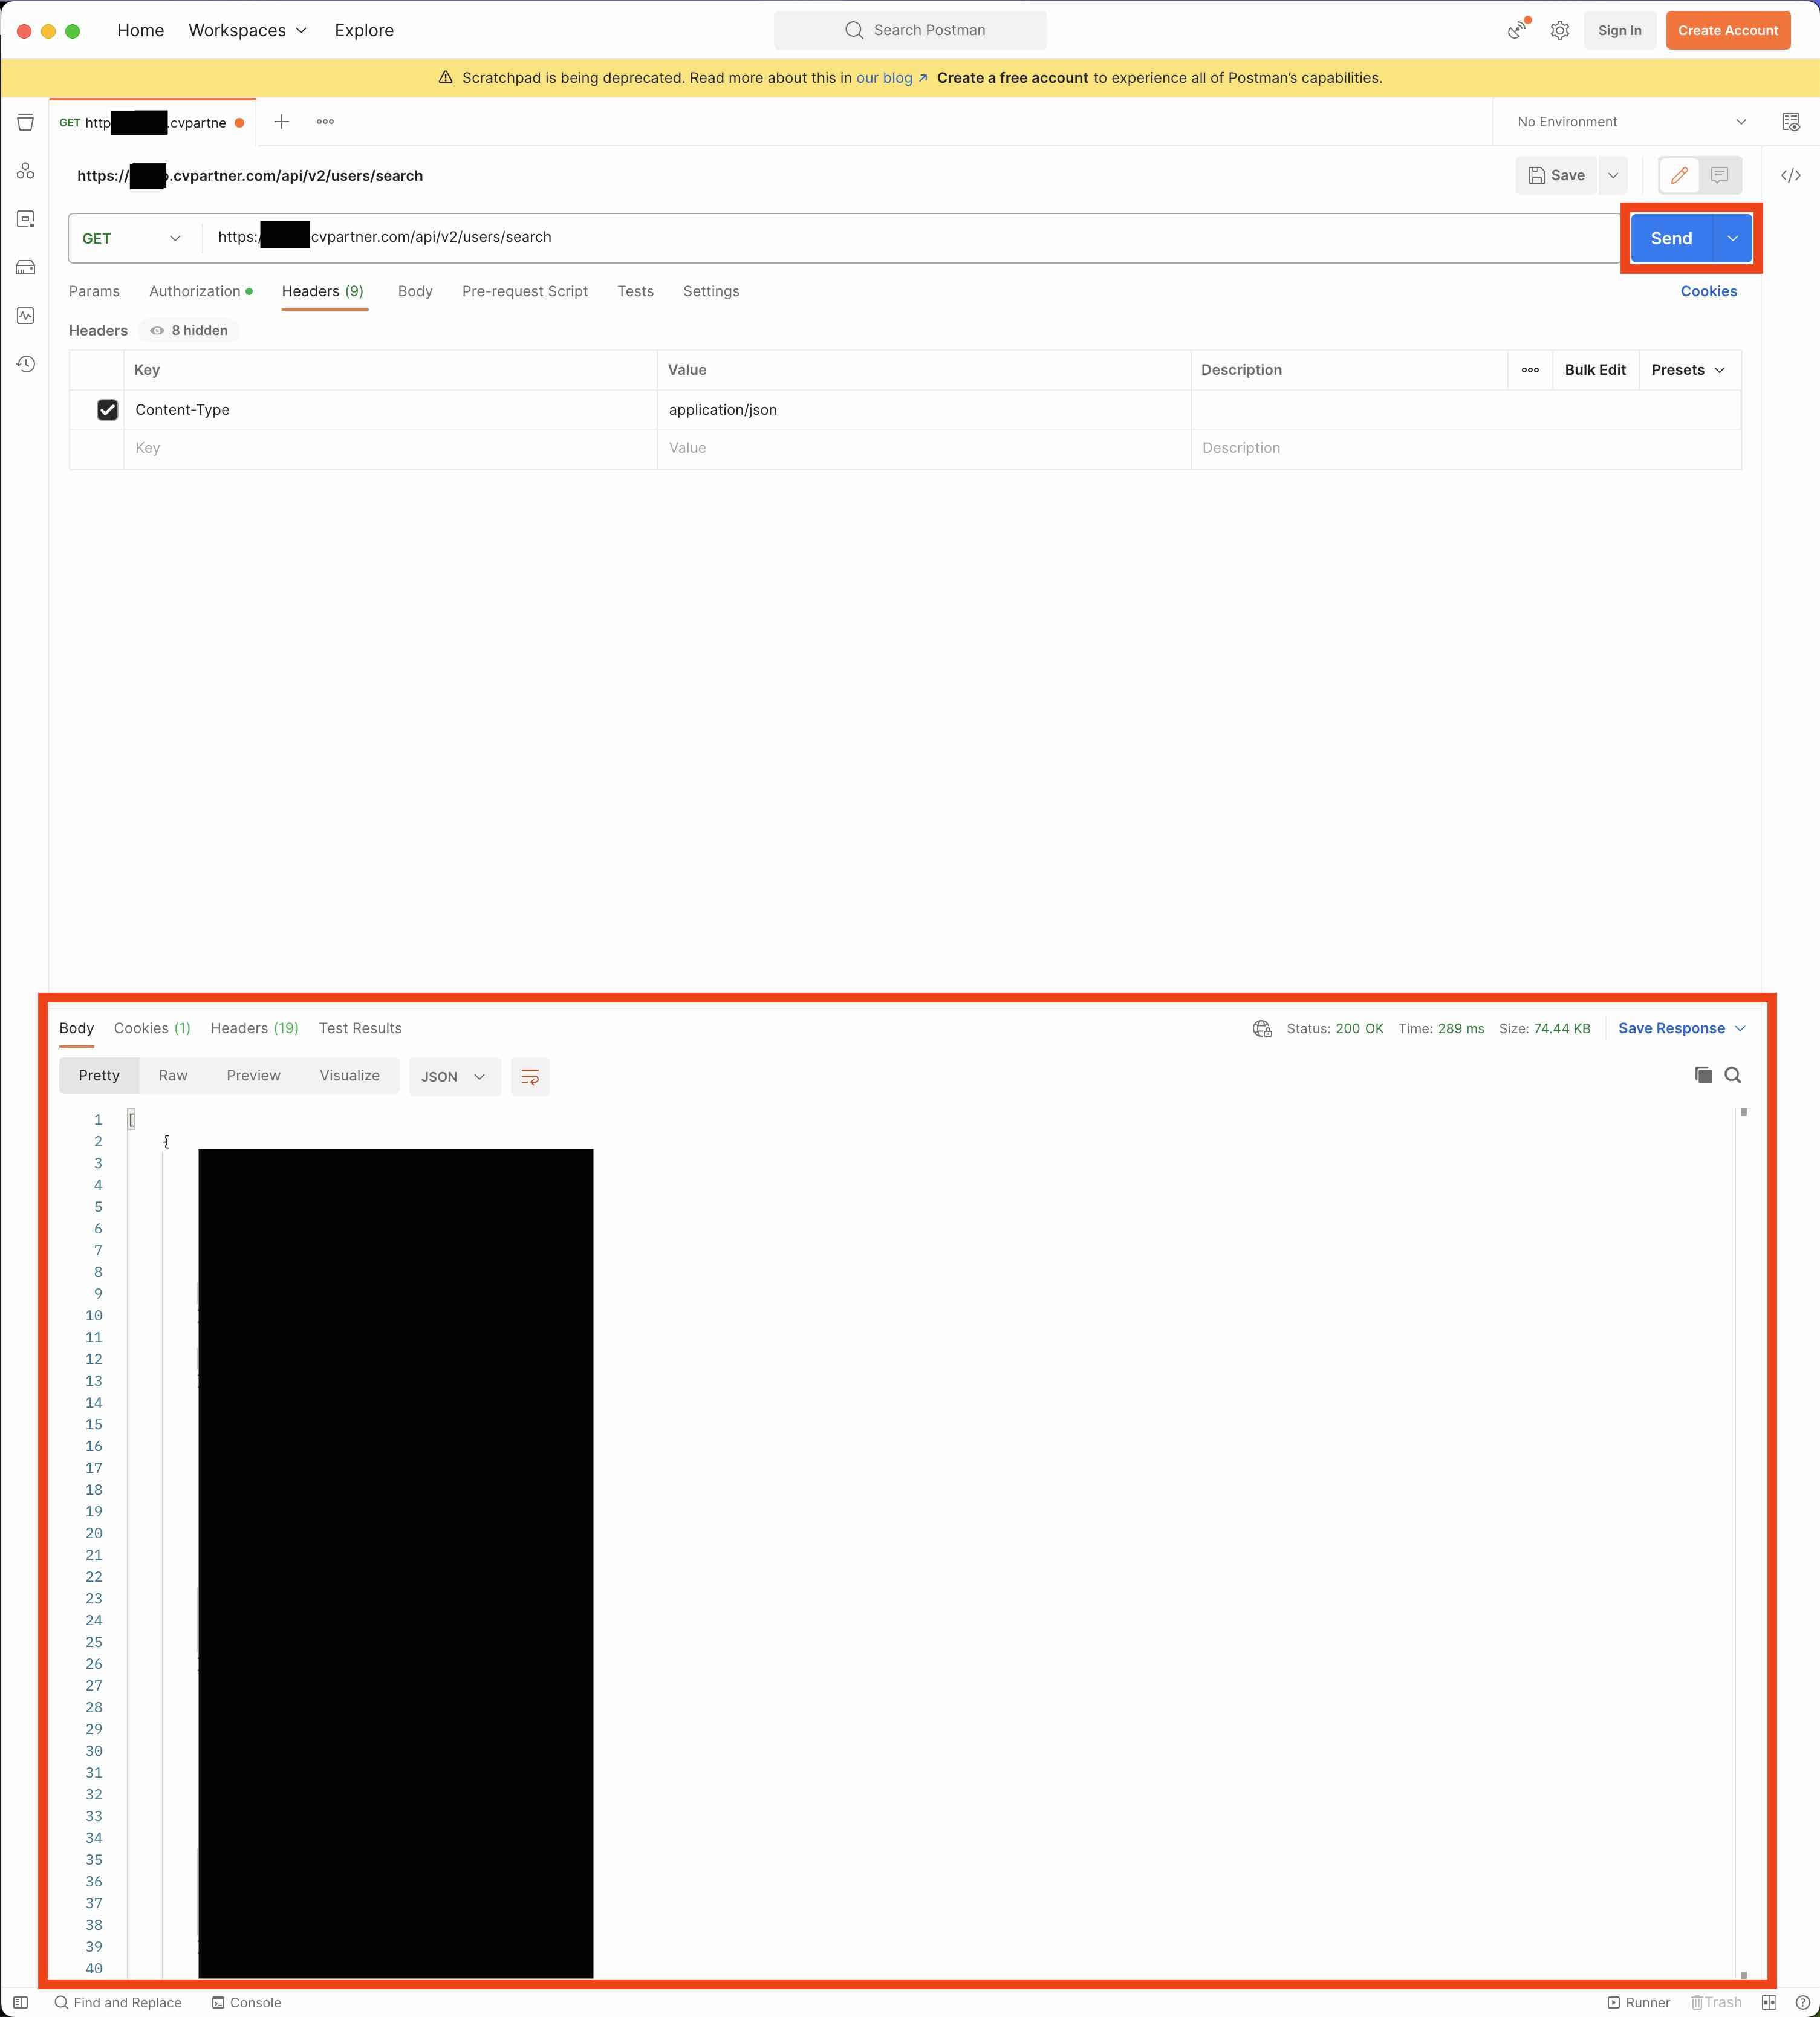
Now that you have configured a request, press the 'Send' button to send it.
You should see a panel appear at the bottom of the screen outlining the response you get back. The response should contain a list with some of the users in your company.
Using the REST API
This section covers what you need to know to work with our REST API endpoints.
Request Encoding
All data submitted to the API should be encoded using UTF-8 unless otherwise specified in the endpoint documentation.
Request Content-Type
When making PUT and POST requests to the API, set the Content-Type header to application/json. This tells the server that the request payload is in JSON format. Attachment uploads are the exception: they use multipart/form-data.
curl --location 'https://<subdomain>.flowcase.com/api/v4/search' \
--header 'Content-Type: application/json' \
--header 'Authorization: Bearer •••328e' \
--data '{"offset": 0,"size": 10,"must": []}'
Additional Fields in Requests
Our API ignores any unknown attributes in request payloads. This makes your clients more resilient to changes, such as field deprecation, and more practical when developing integrations or scripts for onboarding data.
Be aware, though, that a misspelled name of an optional field can be ignored unnoticed and will not raise an invalid input error. For example, "title": "Project Manager" versus "Title": "Project Manager".
Parsing Responses
Our API endpoints use JSON for request and response payloads, unless stated otherwise in the endpoint documentation. To handle API responses effectively, we recommend using a JSON parsing library that can gracefully ignore unknown fields.
This allows us to evolve and enhance the API endpoints while keeping backward compatibility. By ignoring unknown fields, your client application keeps working even if new fields are introduced in API responses in the future.
Please note that API responses may contain more fields than defined in the reference documentation. Do not rely on these additional undocumented fields, as they may not keep backward compatibility and can change without notice.
Request IDs
Every API request includes a unique identifier in the x-request-id response header. Log this request ID in your application, and give it to our support team when reporting any issues. This helps us identify and troubleshoot problems quickly.
Here is an example of how to read the request ID in Python using the requests library:
response = requests.get(url, headers=headers)
request_id = response.headers['x-request-id']
print(f"Request ID: {request_id}")
In Postman, you can find the request ID in the response headers section after making a request.
Including the request ID in your logs and support messages lets our team resolve any issues you meet while using the Flowcase API.
Multilingual Text Fields
Flowcase APIs support multilingual string fields throughout the system. These fields let you:
- Store content in multiple languages
- Display values in the user's preferred language
- Auto-translate content between languages
- Export résumés and proposals in different languages
Format
Multilingual fields use a standardised JSON structure:
{
  "field_name": {
    "int": "Hello World",
    "no": "Hei Verden",
    "de": "Hallo Welt"
  }
}
Note: at least one language version is required for multilingual fields.
By default the API returns and accepts legacy language codes, such as int for English, se for Swedish and cn for Chinese. Pass ?use_legacy_codes=false on any request to use standard ISO 639-1 codes instead (en, sv, zh). New integrations should use use_legacy_codes=false; the legacy codes exist for backward compatibility with older integrations. Both sets of codes appear in the API documentation examples.
The parameter affects both responses and request parsing, so language keys in a request body must match the active mode. Keys that are invalid in the active mode are silently dropped. For the full list of codes, see Country & Language Codes.
Updating Multilingual Fields
Multilingual fields must be updated as complete objects. Partial updates are not supported: you must include all language variants in your update request. Any existing languages omitted from the update will be removed.
Example: Updating a Project Name
Current state:
{
  "project_name": {
    "int": "Cloud Migration",
    "no": "Skymigrering",
    "de": "Cloud-Migration"
  }
}
Incorrect update (removes the Norwegian and German translations):
{
  "project_name": {
    "int": "Cloud Migration Project"
  }
}
Correct update (keeps all languages):
{
  "project_name": {
    "int": "Cloud Migration Project",
    "no": "Skymigrering Prosjekt",
    "de": "Cloud-Migrationsprojekt"
  }
}